首先对AVFoundation的了解(指我的了解因为我能力有限所以可能有不到位的地方)
AVFoundation是一个可以用来使用和创建基于时间的视听媒体的框架,例如:您可以用它来检查,创建,编辑或是重新编码媒体文件。也可以从设备中获取输入流,在视频实时播放时操作和回放。下图时AVFoundation在IOS中的架构。

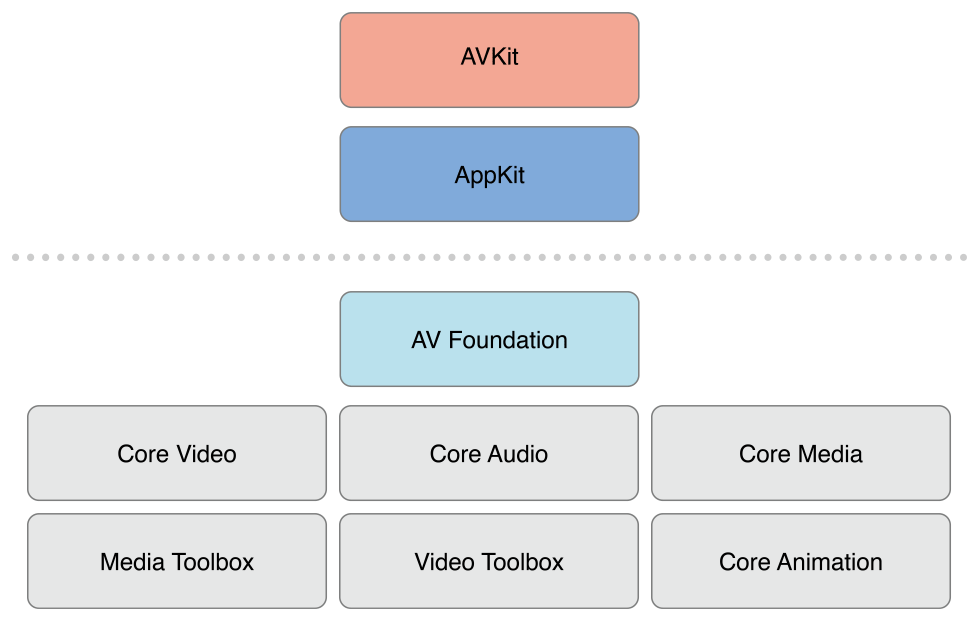
具体请看http://www.jianshu.com/p/cc79c45b4ccf
为了熟悉AVFoundation 我自己写了二维码扫描
为了捕捉视频,我们需要这样几种类(与其它的子类)。
AVCaptureDevice 代表了输入设备,例如摄像头与麦克风。
AVCaptureInput 代表了输入数据源
AVCaptureOutput 代表了输出数据源
AVCaptureSession 用于协调输入与输出之间的数据流
并且还有AVCaptureVideoPreviewLayer提供摄像头的预览功能
1.创建AVCaputureSession。这个是对输出流合输入流的处理
2.创建AVCaptureDevice。 这个是获取输入的设备
 /*!
 @method defaultDeviceWithMediaType:
 @abstract
    Returns an AVCaptureDevice instance for the default device of the given media type.

 @param mediaType
    The media type, such as AVMediaTypeVideo, AVMediaTypeAudio, or AVMediaTypeMuxed, supported by the returned device.
 @result
    The default device with the given media type, or nil if no device with that media type exists.

 @discussion
    This method returns the default device of the given media type currently available on the system. For example, for
    AVMediaTypeVideo, this method will return the built in camera that is primarily used for capture and recording.
    Media type constants are defined in AVMediaFormat.h.
*/
public class func defaultDeviceWithMediaType(mediaType: String!) -> AVCaptureDevice!
3.创建AVCaptureDeviceInput,添加到session
do {
     //输入流
     let  input = try AVCaptureDeviceInput(device: device)
     session.addInput(input)
 }catch{
     print("相机不可以")
 }
4.创建AVCaptureOutput,并设置代理,添加到session
let output = AVCaptureMetadataOutput()
output.metadataObjectTypes = [AVMetadataObjectTypeQRCode]
output.setMetadataObjectsDelegate(self, queue:dispatch_get_main_queue() )
session.canSetSessionPreset(AVCaptureSessionPresetHigh)
session.addOutput(output)
代码:
//流的处理 (输出,输入)
                let session = AVCaptureSession()
                //获取设备//摄像头和麦克风

                let device = AVCaptureDevice.defaultDeviceWithMediaType(AVMediaTypeVideo)
                do {
                    //输入流
                    let  input = try AVCaptureDeviceInput(device: device)
                    session.addInput(input)
                }catch{
                     let alertvc = UIAlertController(title: "温馨提示", message: "请在iPhone的\"设置-隐私-相机\"选项中,允许本程序访问您的相机", preferredStyle:UIAlertControllerStyle.Alert)
                    let certain = UIAlertAction(title: "确定", style: UIAlertActionStyle.Default, handler: { (_) in
                        guard let url = NSURL(string:UIApplicationOpenSettingsURLString) else {return}

                        if UIApplication.sharedApplication().canOpenURL(url) {
                            UIApplication.sharedApplication().openURL(url)
                        }


                    })
                    let cancel = UIAlertAction(title: "取消", style: UIAlertActionStyle.Cancel, handler: { (_) in

                    })
                    alertvc.addAction(cancel)
                    alertvc.addAction(certain)
                    return

                }
                //在生成拍摄回话时原来直接设置的是最高清画质,但对于ipod 5这类低配设备是不支持的,故在此我采取了下面这种方式来设置画质。


                //session.sessionPreset = AVCaptureSessionPreset1920x1080;//设置图像输出质量


                // 输出流 代理回调
                let output = AVCaptureMetadataOutput()


                session.canSetSessionPreset(AVCaptureSessionPresetHigh)
                session.addOutput(output)
                output.metadataObjectTypes = [AVMetadataObjectTypeQRCode]
                output.setMetadataObjectsDelegate(self, queue:dispatch_get_main_queue() )
                let previewLayer = AVCaptureVideoPreviewLayer(session:session)
                previewLayer.videoGravity = AVLayerVideoGravityResizeAspectFill

                previewLayer.frame = CGRectMake(0, 0, kScreen_width, kScreen_height)

                let rect = CGRectMake((kScreen_width - 250) / 2.0, (kScreen_height - 250 - 72)/2.0, 250.0, 250.0);
                print(rect)
                //let rectOfInterest = previewLayer.metadataOutputRectOfInterestForRect(rect)
                let rectOfInterest = CGRectMake(rect.origin.y/kScreen_height, rect.origin.x/kScreen_width,  rect.size.height/kScreen_height,rect.size.width/kScreen_width)
                print(rectOfInterest)
                output.rectOfInterest = rectOfInterest
                self.view.layer.addSublayer(previewLayer)
                //执行
                session.startRunning()
  var maskY:CGFloat = 0.0
    if (self.navigationController != nil){
        maskY = 64.0
    }

    let maskView = UIView(frame:CGRectMake(0, maskY, kScreen_width, kScreen_height - maskY))
    maskView.backgroundColor = UIColor(red: 0, green: 0, blue: 0, alpha: 0.6)
    self.view.addSubview(maskView)

    let rectPath = UIBezierPath(rect:CGRectMake(0, 0, kScreen_width, kScreen_height))
    //    [rectPath appendPath:[[UIBezierPath bezierPathWithRect:CM((SCREEN_WIDTH - 250) / 2, 66, 250, 250)] bezierPathByReversingPath]];
    let roundedRect = UIBezierPath(roundedRect:CGRectMake((kScreen_width - 250) / 2, (kScreen_height - 250 - 72)/2 - maskY, 250, 250),cornerRadius:1.0)
    rectPath.appendPath(roundedRect.bezierPathByReversingPath())

    let shapeLayer = CAShapeLayer()
    shapeLayer.path = rectPath.CGPath;

    maskView.layer.mask = shapeLayer;

    let scanAreaImageView = UIImageView(frame:rect)

    scanAreaImageView.layer.cornerRadius = 2
    scanAreaImageView.layer.borderColor = UIColor.orangeColor().CGColor
    scanAreaImageView.layer.borderWidth = 1
    self.view.addSubview(scanAreaImageView)


   extension QRCatchViewControll:AVCaptureMetadataOutputObjectsDelegate{

func captureOutput(captureOutput: AVCaptureOutput!, didOutputMetadataObjects metadataObjects: [AnyObject]!, fromConnection connection: AVCaptureConnection!){

    if metadataObjects.count <= 0{
        print("metadataObjects.count\(metadataObjects.count)")
        return
    }

    for  metadataObject  in metadataObjects {
        guard let qrcodeTypeObject = metadataObject as? AVMetadataMachineReadableCodeObject else{return}
        if qrcodeTypeObject.type == AVMetadataObjectTypeQRCode {
            print(qrcodeTypeObject.stringValue)
        }else{
            print(qrcodeTypeObject.stringValue)

        }

    }


}