导语:写这个文章首先最近集成了七鱼客服来写写 其实七鱼客服文档已经比较详细,文档地址http://qiyukf.com/doc/sdk/_book/iOS_SDK_Guide.html 我当然也加了自己在集成过程中遇到的一些的小东西。
一.集成SDK
1.下载 QY SDK,得到一个 .a 文件、QYResouce 文件夹和 ExportHeaders 文件夹,将他们导入工程
下载sdk地址http://nos.netease.com/ysf/QIYU_iOS_SDK_v1.2.1.zip
2. 添加 QY SDK 依赖库
MobileCoreService.framework
SystemConfiguration.framework
AVFoundation.framwork
CoreTelephony.framework
CoreMedia.framework
AudioToolbox.framework
libz.lib
libstdc++.6.0.9.dylib
libsqlite3.0.dylib
3.在 Other Linker Flags 中添加 -ObjC
- 在需要使用 SDK 的地方 import “QYSDK.h”
二.SDK 类讲解
- QYSDK 整个SDK的主入口,单例;主要提供SDK初始化、追踪用户浏览信息、注销当前账号、获取客服聊天ViewController、获取会话管理类功能。
添加 SDK 初始化方法
-(BOOL)application:(UIApplication )application didFinishLaunchingWithOptions:(NSDictionary )launchOptions {
[[QYSDK sharedSDK] registerAppId:AppKey
                          appName:App名称];
return YES;
}
appName(就是SDK 1.0.0版本的cerName,参数名变了) 对应管理后台添加一个app时填写的App名称
登出
[[QYSDK sharedSDK] logout:^(){}];应用层登出/注销自己的账号时需要调用 SDK 的登出操作,该操作会通知服务器进行 APNS 推送信息的解绑操作,避免用户已登出但推送依然发送到当前设备的情况发生。
- 获取客服聊天ViewController
   //获取QYSessionViewController
   QYSource *source = [[QYSource alloc] init];
   source.title =  @"...";
   source.urlString = @"http://iasku.com/";
   QYSessionViewController *vc = [[QYSDK sharedSDK] sessionViewController];
   vc.sessionTitle = @"客服";
   vc.source = source;
   vc.navigationItem.hidesBackButton = YES;
   [self.navigationController pushViewController:vc animated:YES];`

注意:应用层获取此ViewController之后,必须嵌入到UINavigationcontroller中,这样就可以获得会话窗口的UI以及所有功能。
设置用户信息
创建一个QYUserInfo实例,将包含用户信息的 JSON 字符串填充到QYUserInfo.data。调用setUserInfo时将此QYUserInfo实例作为参数传递给七鱼云客服 SDK。
   QYUserInfo *userInfo = [[QYUserInfo alloc] init];
   userInfo.userId = @"uid";

   userInfo.data = @"[{\"key\":\"real_name\", \"value\":\"土豪\"},""{\"key\":\"mobile_phone\", \"hidden\":true},"
            "{\"key\":\"email\", \"value\":\"13800000000@163.com\"},"
              "{\"index\":0, \"key\":\"account\", \"label\":\"账号\", \"value\":\"zhangsan\", \"href\":\"http://example.domain/user/zhangsan\"},"
              "{\"index\":1, \"key\":\"sex\", \"label\":\"性别\", \"value\":\"先生\"},"
              "{\"index\":5, \"key\":\"reg_date\", \"label\":\"注册日期\", \"value\":\"2015-11-16\"},"
              "{\"index\":6, \"key\":\"last_login\", \"label\":\"上次登录时间\", \"value\":\"2015-12-22 15:38:54\"}]";`

   [[QYSDK sharedSDK] setUserInfo:userInfo];


注意:data字段的内容需使用JSON.stringify()进行序列化。为保持良好的兼容性,若要支持较低版本的浏览器(如IE8及更低版本)则需引入第三方JSON库,如 [JSON3](http://bestiejs.github.io/json3/)。
七鱼云客服系统轻量对接中的参数,不论是 Web SDK、iOS SDK、还是 Android SDK,都由一个用户唯一性标识uid和一个表示用户信息的 JSON 数组data组成。

 在iOS SDK 中,定义了一个保存用户信息的结构体:iOS 中为     QYUserInfo。iOS SDK 中,QYUserInfo.userId成员为用户唯一    性标识字符串,QYUserInfo.data成员为表示用户信息的 JSON 字符串。


  userInfo: 字段“id”表示用户id,字段“data”表示用户信息
七鱼云客服企业信息对接开发指南原文档[http://qiyukf.com/doc/    sdk/_book/qiyu_crm_interface.html](http://qiyukf.com/    doc/sdk/_book/qiyu_crm_interface.html)
- 获取自定义UI类
 //会话窗口上方提示条中的文本字体颜色
  [[QYSDK sharedSDK] customUIConfig].sessionTipTextColor = [UIColor blackColor];

  //会话窗口上方提示条中的文本字体大小
  [[QYSDK sharedSDK] customUIConfig].sessionTipTextFontSize = 20;

 //访客文本消息字体颜色
 [[QYSDK sharedSDK] customUIConfig].customMessageTextColor = [UIColor blackColor];

 //访客文本消息字体大小
 `[[QYSDK sharedSDK] customUIConfig].customMessageTextFontSize = 20;`

 //客服文本消息字体颜色
 [[QYSDK sharedSDK] customUIConfig].serviceMessageTextColor = [UIColor blackColor];

 //客服文本消息字体大小
 [[QYSDK sharedSDK] customUIConfig].serviceMessageTextFontSize = 20;`

 //提示文本消息字体颜色
 [[QYSDK sharedSDK] customUIConfig].tipMessageTextColor = [UIColor blueColor];`

 //提示文本消息字体大小
 [[QYSDK sharedSDK] customUIConfig].tipMessageTextFontSize = 16;`

 //输入框文本消息字体颜色
 [[QYSDK sharedSDK] customUIConfig].inputTextColor = [UIColor blueColor];

 //输入框文本消息字体大小
 [[QYSDK sharedSDK] customUIConfig].inputTextFontSize = 20;

// 消息tableview的背景图片
 UIImageView *imageView = [[UIImageView alloc] initWithImage:[UIImage imageNamed:@"session_bg"]];
 imageView.contentMode = UIViewContentModeScaleToFill;
 [[QYSDK sharedSDK] customUIConfig].sessionBackground = imageView;

 //会话窗口上方提示条中的背景颜色
 [[QYSDK sharedSDK] customUIConfig].sessionTipBackgroundColor = [UIColor blueColor];

 //访客头像
 [[QYSDK sharedSDK] customUIConfig].customerHeadImage = [UIImage imageNamed:@"customer_head"];

 //客服头像
 [[QYSDK sharedSDK] customUIConfig].serviceHeadImage = [UIImage imageNamed:@"service_head"];

 //消息竖直方向间距
 //[[QYSDK sharedSDK] customUIConfig].sessionMessageSpacing = 20;

 //访客消息气泡normal图片
 [[QYSDK sharedSDK] customUIConfig].customerMessageBubbleNormalImage = [[UIImage imageNamed:@"icon_sender_node"]
                                      resizableImageWithCapInsets:UIEdgeInsetsMake(15,15,30,30)
                                      resizingMode:UIImageResizingModeStretch];


 //访客消息气泡pressed图片
 [[QYSDK sharedSDK] customUIConfig].customerMessageBubblePressedImage = [[UIImage imageNamed:@"icon_sender_node"]
                                       resizableImageWithCapInsets:UIEdgeInsetsMake(15,15,30,30)
                                       resizingMode:UIImageResizingModeStretch];

 //客服消息气泡normal图片
 [[QYSDK sharedSDK] customUIConfig].serviceMessageBubbleNormalImage = [[UIImage imageNamed:@"icon_receiver_node"]
                                     resizableImageWithCapInsets:UIEdgeInsetsMake(15,30,30,15)
                                     resizingMode:UIImageResizingModeStretch];

 //客服消息气泡pressed图片
 [[QYSDK sharedSDK] customUIConfig].serviceMessageBubblePressedImage = [[UIImage imageNamed:@"icon_receiver_node"]
                                      resizableImageWithCapInsets:UIEdgeInsetsMake(15,30,30,15)
                                      resizingMode:UIImageResizingModeStretch];

 //默认是YES,默认rightBarButtonItem内容是黑色,设置为NO,可以修改为白色
 [[QYSDK sharedSDK] customUIConfig].rightBarButtonItemColorBlackOrWhite = NO;
QYCustomUIConfig是负责自定义UI的类;目前主要是定义会话相关的字体颜色、大小、头像图片等。
注意:访客头像动态获取我目前没发现问题,但是我问客服她说没这个功能,但是我只成功的,但是sessionTipTextColor这个属性设置没有效果,但是后期他们会补上,可能你目前已经修复这个问题(我目前他的demo是 1.0 (build 10) 大小:7.4 MB 2016-03-24 )
还有因为静态库不能放资源 所以我们还可以直接更换图片素材QYCustomUIConfig只是负责替换部分皮肤相关内容,不包含所有的图片素材的替换。iOS SDK支持所有图片素材替换,只需要新建QYCustomResource.bundle,在其中放置跟QYResource.bundle中同名的图片素材,即可实现替换。为了效果好,应该放置同等尺寸的图片。
注意:名字得一样
####三.APNS推送
如果你的工程已经注册推送就直接导出p12文件,上传就可以了,我就是之前工程已经有推送了。
* 如果没有哪句先制作推送证书并在管理后台配置 这个七鱼文档有,我也借用下这个真不好写http://qiyukf.com/doc/sdk/_book/iOS_apns.html[[QYSDK sharedSDK] registerWithAppID:你的APPKEY cerName:你的推送证书名];//但是我在sdk里面没找到这个方法
  - (void)registerAPNs
{
if ([[UIApplication sharedApplication] respondsToSelector:@selector(registerForRemoteNotifications)])
{
   UIUserNotificationType types = UIRemoteNotificationTypeBadge | UIRemoteNotificationTypeSound |         UIRemoteNotificationTypeAlert;
   UIUserNotificationSettings *settings = [UIUserNotificationSettings settingsForTypes:types
   categories:nil];
   [[UIApplication sharedApplication] registerUserNotificationSettings:settings];
   [[UIApplication sharedApplication] registerForRemoteNotifications];
}
else
{
   UIRemoteNotificationType types = UIRemoteNotificationTypeAlert | UIRemoteNotificationTypeSound |         UIRemoteNotificationTypeBadge;
   [[UIApplication sharedApplication] registerForRemoteNotificationTypes:types];
}
}


- (void)application:(UIApplication *)app didRegisterForRemoteNotificationsWithDeviceToken:(NSData *)deviceToken
{
[[QYSDK sharedSDK] updateApnsToken:deviceToken];
}
三.我遇到的问题
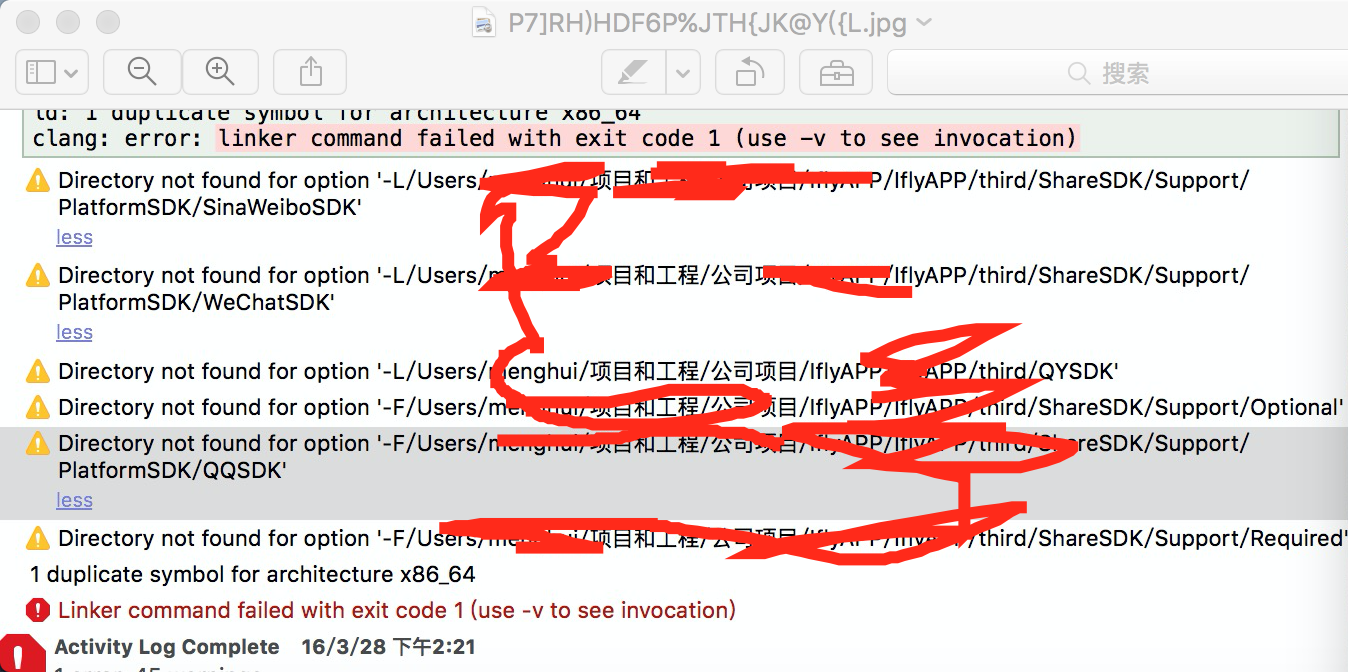
- 解决:工程里使用的ZXing的二维码识别类库中,有bitcount的符号,而SDK由于支持bitCode所以产生了bit_cnt的符号,编译后造成冲突,解决方法就是把ZXing文件中的叫bitcount的改下名字就可以了 全局搜bitcount 改个名字的 如wk_bitcount
还有些问题我在 上面陈述的时候也提到了 我遇到的问题,也希望能帮到你0.0